Note
Go to the end to download the full example code.
Advanced ONNX models quantization
Akida, like any specialized hardware accelerator, sacrifices very generalized computational ability in favor of highly optimized implementations of a subset of key operations. While we strive to make sure that Akida directly supports the most important models, it isn’t feasible to support all possibilities. You may thus occasionally find yourself with a model which is very nearly compatible with Akida, but which fails to convert due to just a few incompatibilities. In this example, we will look at some simple workarounds and how to implement them. The goal is to successfully convert the model to Akida without having to retrain.
Preparing a model for Akida requires two steps: quantization, followed by conversion for a specific target hardware device. We try to catch as many incompatibilities as possible at the quantization step. However, some constraints depend on the specific target device, and can only be caught at the conversion step. To illustrate, we will simply walk through the process of preparing MobileNetV4 for acceleration on Akida - we’ll run into several incompatibilities at different points in that process, and see how to resolve them.
This example assumes a moderate level of experience with deep learning, and good familiarity with the operations typically encountered in these types of models. For example, here we’ll use the following workarounds:
to avoid an incompatible padding scheme in convolution, we will overwrite paddings values when not aligned with Akida expectations,
in order to handle an unsupported kernel-size 5/stride 2 depthwise convolution, we’ll split that into two equivalent operations: a kernel-size 5 depthwise convolution using the same weights, but with stride 1; followed by a kernel-size 3/stride 2 depthwise convolution with identity weights.
Note
pip install optimum[exporters]
1. Get model and data
Before diving into the model incompatibilities and how to resolve them, we’ll need to acquire some sample data to test on, plus the pretrained model.
1.1 Data
Given that the reference model was trained on ImageNet dataset
(which is not publicly available), this tutorial uses a set of 10 copyright free images.
A helper function imagenet.preprocessing.get_preprocessed_samples loads
and preprocesses (decodes, crops and extracts a square 224x224x3 patch from an input image)
these images.
import numpy as np

from akida_models.imagenet import get_preprocessed_samples
from akida_models.imagenet.imagenet_utils import IMAGENET_MEAN, IMAGENET_STD

# Model specification and hyperparameters
NUM_CHANNELS = 3
IMAGE_SIZE = 224

# Load the preprocessed images and their corresponding labels for the test set
x_test_raw, labels_test = get_preprocessed_samples(IMAGE_SIZE, NUM_CHANNELS)
num_images = x_test_raw.shape[0]

# Normalize images as models expects
imagenet_mean_255 = np.array(IMAGENET_MEAN, dtype="float32") * 255.0
imagenet_std_255 = np.array(IMAGENET_STD, dtype="float32") * 255.0
x_test = ((x_test_raw - imagenet_mean_255) / imagenet_std_255)

# Transpose the channels to the first axis as per the default for ONNX models
x_test = np.transpose(x_test, (0, 3, 1, 2))

print(f'{num_images} images and their labels are loaded and preprocessed.')
10 images and their labels are loaded and preprocessed.
1.2 Download the model
We download MobileNetV4 small from the HuggingFace hub.
import onnx
from optimum.exporters.onnx import main_export

# Download and convert MobiletNetV4 to ONNX
main_export(model_name_or_path="timm/mobilenetv4_conv_small.e2400_r224_in1k",
            task="image-classification", output="./")

# Load the model in memory
onnx_model = onnx.load_model("./model.onnx")
1.3 Evaluate model performance
The ONNXRuntime package is a cross-platform accelerator capable of loading and running models described in ONNX format. We use this framework to evaluate the performance of the loaded ResNet50 model.
Note
For example purposes, we only compute accuracy on 10 images. Accuracy on the full ImageNet validation set is reported at the end.
from onnxruntime import InferenceSession


def evaluate_onnx_model(model):
    sess = InferenceSession(model.SerializeToString())
    # Calculate outputs by running images through the session
    outputs = sess.run(None, {model.graph.input[0].name: x_test})
    # The class with the highest score is what we choose as prediction
    predicted = np.squeeze(np.argmax(outputs[0], 1))
    # Compute the number of valid predictions
    return int((predicted == labels_test).sum())


# Evaluate over test dataset
correctly_classified_floating = evaluate_onnx_model(onnx_model)
print(f'Floating point model accuracy: {correctly_classified_floating}/{num_images}.')
Floating point model accuracy: 9/10.
2. Quantize
Akida processes integer inputs, activations and weights. Therefore, the first step in preparing a floating point model to run on Akida is to quantize it using QuantizeML quantize().
Note
Please refer to the QuantizeML toolkit user guide and the Advanced QuantizeML tutorial for further details. In particular here, for simplicity, we pass only the small number of samples we already prepared for calibration. Typically, you will want to use many more samples for calibration, say 1000 if you have them available; and not drawn from your test data. The akida_models package provides a helper function, extract_samples() which may be helpful in preparing those.
from quantizeml.models import quantize

model_quantized = quantize(onnx_model, samples=x_test)
Calibrating with 10/10.0 samples
The model was quantized successfully, we can check its accuracy:
correctly_classified = evaluate_onnx_model(model_quantized)
print(f'Quantized model accuracy: {correctly_classified}/{num_images}.')
Quantized model accuracy: 9/10.
3. Conversion
3.1. Incompatibility at Conversion
While most imcompatibilities will be picked up at the quantization step, some constraints are specific to the target hardware device, and can only be applied at the conversion step. We can detect these either with the check_model_compatibility tool, or by trying to convert the model into Akida.
from cnn2snn import convert

try:
    akida_model = convert(model_quantized)
except Exception as e:
    print(f"MobileNetV4 is not fully accelerated by Akida. Reason: {str(e)}")
MobileNetV4 is not fully accelerated by Akida. Reason: Cannot convert /conv_stem/Conv: Expect pads [0, 0, 1, 1] (found [1, 1, 1, 1]) in /conv_stem/Conv.
This error is raised because the MobileNetV4 padding scheme is specific and differs from the TF-Keras/Akida standard.
Ideally, we should aim to swap incompatible operations with mathematically equivalent replacements. For issues of convolution kernel size or padding, we can often achieve that by putting the kernel weights within a larger kernel, placed eccentrically to compensate for any padding issues etc. In this case, we’ll try simply modifying the padding to be Akida-compatible.
To achieve this, we’ll define custom quantization pattern to modify the model before quantization. Rather than try to provide a general solution, we’ll hard code this for the problem layers.
3.2. About Patterns
For efficiency, Akida hardware actually groups certain commonly occuring operations together. For example, ReLU activation functions, where present, are almost always applied on the outputs of the hard-working computational layers (Convolutions, Depthwise Convolutions, Dense layers etc.). So the ReLU on Akida is tied to those operations. While efficient, this does mean that some sequences of operations will not by default be considered Akida-compatible, even though the individual operations are known to be handled. That’s the cause of the problem encountered here.
To properly see what’s going on, and to resolve the problem, we’ll need to understand the concept of “patterns”. These are the objects that QuantizeML uses to map ONNX models to their Akida equivalents. A pattern is a sequence of continuous ONNX operators in a graph that can be converted to an Akida V2 layer. For example, the following model would be converted to an akida.InputConv2D layer:
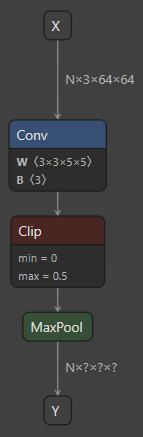
One ONNX configuration that would map to an InputConv2D.
The sequence of operators [Conv, Clip, MaxPool] is one valid pattern
for conversion towards InputConv2D.
Crucially, we can check the list of the currently supported patterns:
from quantizeml.onnx_support.quantization.register_patterns import PATTERNS_MAP

print(*PATTERNS_MAP, sep='\n')
QuantizerPattern(pattern=('Conv', 'Relu', 'GlobalAveragePool'), f=[<function get_qconv at 0x7145762b1a80>])
QuantizerPattern(pattern=('Conv', 'MaxPool', 'Relu'), f=[<function get_qconv at 0x7145762b1a80>])
QuantizerPattern(pattern=('Conv', 'GlobalAveragePool'), f=[<function get_qconv at 0x7145762b1a80>])
QuantizerPattern(pattern=('Conv', 'Relu'), f=[<function get_qdepthwise at 0x7145762b2c00>, <function get_qconv at 0x7145762b1a80>])
QuantizerPattern(pattern=('Conv', 'Clip', 'GlobalAveragePool'), f=[<function get_qconv at 0x7145762b1a80>])
QuantizerPattern(pattern=('Conv', 'MaxPool', 'Clip'), f=[<function get_qconv at 0x7145762b1a80>])
QuantizerPattern(pattern=('Conv', 'activation', 'GlobalAveragePool'), f=[<function get_qconv at 0x7145762b1a80>])
QuantizerPattern(pattern=('Conv', 'Clip'), f=[<function get_qdepthwise at 0x7145762b2c00>, <function get_qconv at 0x7145762b1a80>])
QuantizerPattern(pattern=('Conv', 'activation'), f=[<function get_qdepthwise at 0x7145762b2c00>, <function get_qconv at 0x7145762b1a80>])
QuantizerPattern(pattern=('Conv',), f=[<function get_qdepthwise at 0x7145762b2c00>, <function get_qconv at 0x7145762b1a80>])
QuantizerPattern(pattern=('Flatten', 'Gemm', 'Relu'), f=[<function get_qgemm at 0x7145762b2d40>])
QuantizerPattern(pattern=('Flatten', 'Gemm', 'Clip'), f=[<function get_qgemm at 0x7145762b2d40>])
QuantizerPattern(pattern=('Flatten', 'Gemm'), f=[<function get_qgemm at 0x7145762b2d40>])
QuantizerPattern(pattern=('Gemm', 'Relu'), f=[<function get_qgemm at 0x7145762b2d40>])
QuantizerPattern(pattern=('Gemm', 'Clip'), f=[<function get_qgemm at 0x7145762b2d40>])
QuantizerPattern(pattern=('Gemm',), f=[<function get_qgemm at 0x7145762b2d40>])
QuantizerPattern(pattern=('Add', 'Relu'), f=[<function get_qadd at 0x7145762b3420>])
QuantizerPattern(pattern=('Add',), f=[<function get_qadd at 0x7145762b3420>])
QuantizerPattern(pattern=('Concat',), f=[<function get_qconcat at 0x7145762b34c0>])
QuantizerPattern(pattern=('ConvTranspose', 'Clip'), f=[<function get_qconv_transpose at 0x7145762b2200>])
QuantizerPattern(pattern=('ConvTranspose', 'Relu'), f=[<function get_qconv_transpose at 0x7145762b2200>])
QuantizerPattern(pattern=('ConvTranspose', 'activation'), f=[<function get_qconv_transpose at 0x7145762b2200>])
QuantizerPattern(pattern=('ConvTranspose',), f=[<function get_qconv_transpose at 0x7145762b2200>])
QuantizerPattern(pattern=('Transpose', 'Mul', 'Add'), f=[<function get_input_quantizer at 0x7145762971a0>])
QuantizerPattern(pattern=('Transpose', 'Mul'), f=[<function get_input_quantizer at 0x7145762971a0>])
QuantizerPattern(pattern=('Mul', 'Add'), f=[<function get_input_quantizer at 0x7145762971a0>])
QuantizerPattern(pattern=('Mul',), f=[<function get_input_quantizer at 0x7145762971a0>])
QuantizerPattern(pattern=('BufferTempConv', 'Relu'), f=[<function get_qbtc at 0x7145762ff4c0>])
QuantizerPattern(pattern=('DepthwiseBufferTempConv', 'Relu'), f=[<function get_qdbtc at 0x7145762ff560>])
QuantizerPattern(pattern=('BufferTempConv',), f=[<function get_qbtc at 0x7145762ff4c0>])
QuantizerPattern(pattern=('DepthwiseBufferTempConv',), f=[<function get_qdbtc at 0x7145762ff560>])
Note
Before the conversion the following changes are automatically done to allow the QuantizeML toolkit to see an ONNX graph suitable for quantization:
transforms the following operators for general purposes:
Conv->DepthwiseConvwhen kernel size is 1 x Kx x Ky andgroupis required
Clip>Relu(ifmin = 0.0)uses Graph Optimizations in ONNX Runtime to optimize the graph (e.g. fuse BatchNorm into convolutions).
3.3. Custom quantization patterns
The existing patterns won’t allow us to map an isolated GlobalAveragePool operation. But, for
example, the pooling operation can be mapped when following a Conv layer, and we can easily
implement a Conv layer that performs an identity operation on its inputs, just by setting the
kernel weights appropriately. We can implement this workaround by using custom quantization
patterns to extend PATTERNS_MAP.
Every pattern includes an ONNX layer that stores the ONNX graph information for the matching sequence of nodes. QuantizeML also allows for a function to create a compatible layer from an initially incompatible pattern. This pattern function has two input parameters: the graph and the pattern-matched sequence of nodes extracted from it.
Once a pattern function is defined for an unsupported pattern, both can be appended
in the quantization context through the custom_pattern_scope function.
from quantizeml.onnx_support import layers
from quantizeml.onnx_support.quantization import custom_pattern_scope


def align_conv_with_akida(block_nodes, graph, tensor_ranges):
    """Pattern function that handles convolutions incompatible with Akida
    """
    # Recover initial ONNXLayer from block nodes and graph
    try:
        qlayer = layers.get_qdepthwise(block_nodes, graph, tensor_ranges)
    except RuntimeError:
        qlayer = layers.get_qconv(block_nodes, graph, tensor_ranges)

    # Force the pads in some convolution to Akida compatible values
    target_pads = None
    if qlayer.name in ['/conv_stem/Conv', '/blocks/blocks.0/blocks.0.0/conv/Conv',
                       '/blocks/blocks.1/blocks.1.0/conv/Conv',
                       '/blocks/blocks.3/blocks.3.0/dw_mid/conv/Conv']:
        target_pads = np.array([0, 0, 0, 0, 0, 0, 1, 1], np.int64)
    elif qlayer.name == '/blocks/blocks.2/blocks.2.0/dw_mid/conv/Conv':
        target_pads = np.array([0, 0, 1, 1, 0, 0, 2, 2], np.int64)

    if target_pads is not None:
        print(f"Setting Akida pads in {qlayer.name}...")
        # Note: pads in convolution include spatial dimension
        qlayer.set_weight("pads", target_pads)

    return qlayer


# Define a custom patterns map as a new pattern and associated replacement function
quantization_pattern_map = {}
for qpattern in PATTERNS_MAP:
    if "Conv" in qpattern.pattern:
        # Update all patterns that contains Conv op_type
        quantization_pattern_map.update({qpattern.pattern: align_conv_with_akida})
# Quantize model with custom patterns
with custom_pattern_scope(quantization_pattern_map):
    model_quantized = quantize(onnx_model, samples=x_test)
Calibrating with 10/10.0 samples
Setting Akida pads in /conv_stem/Conv...
Setting Akida pads in /blocks/blocks.0/blocks.0.0/conv/Conv...
Setting Akida pads in /blocks/blocks.1/blocks.1.0/conv/Conv...
Setting Akida pads in /blocks/blocks.2/blocks.2.0/dw_mid/conv/Conv...
Setting Akida pads in /blocks/blocks.3/blocks.3.0/dw_mid/conv/Conv...
# Evaluate quantized model performance
correctly_classified = evaluate_onnx_model(model_quantized)
print(f'Quantized model accuracy: {correctly_classified}/{num_images}.')
Quantized model accuracy: 10/10.
At this point we can re-check conversion:
try:
    akida_model = convert(model_quantized)
except Exception as e:
    print(f"MobileNetV4 is not fully accelerated by Akida. Reason: {str(e)}")
MobileNetV4 is not fully accelerated by Akida. Reason: Cannot convert /blocks/blocks.2/blocks.2.0/dw_mid/conv/Conv: Stride 2 is only supported with kernel size 3.
Another error is raised due to an Akida incompatiblity: the model comes with a depthwise layer with a kernel size 5 and and stride of 2. Akida only supports stride 2 for kernel size 3 depthwise layers.
3.4. Custom sanitizing
Handling the kernel 5 stride 2 depthwise layer cannot be done using custom quantization pattern. Patterns can only be used to transform one or several nodes towards a single node that matches the chain of operations of an Akida layer. In this case, to overcome the compatibilty issue, the original layer will be replaced by an equivalent set of two layers, decoupling the kernel size and the stride into two distinct layers. A custom santizing step will then be defined and applied to the original model:
The custom sanitizer is implemented using onnxscript. The ONNX Rewriter provides functionality to replace certain patterns in an ONNX graph with replacement patterns based on user-defined rewrite rules, which fits our needs. A tutorial on how to use the ONNX Rewriter can be found at https://microsoft.github.io/onnxscript/tutorial/rewriter/index.html.
from onnxscript.rewriter import ir, pattern
from quantizeml.onnx_support.quantization import ONNXModel


def make_depthwise_compatible(model):
    # Parse all 'Conv' operations
    def find_convs(op, x, w):
        return op.Conv(x, w, _allow_other_inputs=True, _outputs=["conv"])

    # Edit out the depthwise layer so that it becomes: a convolution with kernel 5 and stride 1 with
    # original weights followed by a kernel 3 stride 2 convolution with identity weights
    def replace_depthwise(op, x, w, conv, **__):
        ir_node = conv.producer()
        attributes = ir_node.attributes

        # Change strides to 1 and padding to the Akida expected paddings
        attributes['strides'] = ir.AttrInt64s('strides', [1, 1])
        attributes['pads'] = ir.AttrInt64s('pads', [2, 2, 2, 2])
        dw_kernel_5 = op.Conv(*ir_node.inputs, **attributes)

        # Apply "identity" with kernel size=3 and strides=2 and the Akida expected paddings
        identity_w = np.zeros((w.shape[0], 1, 3, 3), dtype="float32")
        identity_w[np.arange(w.shape[0]), 0, 1, 1] = 1
        identity_w = op.initializer(ir.tensor(identity_w), name=f"{ir_node.name}_identity_weights")

        dw_stride_2 = op.Conv(dw_kernel_5, identity_w, kernel_shape=[3, 3], strides=[2, 2],
                              pads=[0, 0, 1, 1], group=w.shape[0])

        # Note that the new nodes will have different names, so custom patterns that are using names
        # will not be applied.
        return dw_stride_2

    # Only trigger the replacement on the target nodes with group=input channels, kernel_size=5
    # and strides=2
    def is_depthwise_k5_s2(*_, w, conv, **__):
        attributes = conv.producer().attributes
        group = attributes.get('group', ir.AttrInt64('group', 1))
        strides = attributes.get('strides', ir.AttrInt64s('strides', [1]))
        return group.value == w.shape[0] and w.shape[2:] == (5, 5) and strides.value == [2, 2]

    # Define transformation rules
    rules = [pattern.RewriteRule(find_convs, replace_depthwise, is_depthwise_k5_s2)]

    # Apply rewrites
    model.rewrite(rules)
The helper above will replace the depthwise layer with two layers, one with kernel size 5 and stride 1, and the second with kernel size 3 and stride 2:
# Wrap in an ONNXModel: in addition to rewriting, it will infer the shapes and check the model
# after transformations
model_to_sanitize = ONNXModel(onnx_model)
make_depthwise_compatible(model_to_sanitize)
sanitized_model = model_to_sanitize.model
Applied 1 of general pattern rewrite rules.
# Evaluate the transformed model
correctly_classified = evaluate_onnx_model(sanitized_model)
print(f'Sanitized model accuracy: {correctly_classified}/{num_images}.')
Sanitized model accuracy: 9/10.
# Quantize again
with custom_pattern_scope(quantization_pattern_map):
    model_quantized = quantize(sanitized_model, samples=x_test)
Calibrating with 10/10.0 samples
Setting Akida pads in /conv_stem/Conv...
Setting Akida pads in /blocks/blocks.0/blocks.0.0/conv/Conv...
Setting Akida pads in /blocks/blocks.1/blocks.1.0/conv/Conv...
Setting Akida pads in /blocks/blocks.3/blocks.3.0/dw_mid/conv/Conv...
# Re-evaluate quantized model performance
correctly_classified = evaluate_onnx_model(model_quantized)
print(f'Quantized model accuracy: {correctly_classified}/{num_images}.')
Quantized model accuracy: 10/10.
3.5. Successful Conversion
Time to check conversion again
akida_model = convert(model_quantized)
Note
paddings are compatible in the modified depthwise layer because we’ve explicitely set paddings values when rewriting the model (custom sanitize) and they were not overwritten by the quantization patterns since the new nodes have different names.
Great - the model is now both quantized successfully, and can be entirely converted for acceleration on Akida. To check its performance, we need to bear in mind that
images must be numpy-raw, with an 8-bit unsigned integer data type and
the channel dimension must be in the last dimension.
# Evaluate performance
akida_accuracy = akida_model.evaluate(x_test_raw, labels_test)
print(f'Akida model accuracy: {100 * akida_accuracy:.2f} %')
Akida model accuracy: 100.00 %
Note
The images shown in this tutorial are produced through Netron.
Total running time of the script: (0 minutes 10.075 seconds)